Use Cases
Here you'll find the variety of ways that you can use the API:
- Request To Pay
- Pre-Approval
- Transfer
- Validate Account Holder
- Get Balance
Request to Pay
Request to Pay service is used for requesting a payment from a customer (Payer). This can be used by e.g. an online web shop to request a payment for a customer. The customer is requested to approve the transaction on the customer client.

Request to Pay
Request to Pay service is used for requesting a payment from a customer (Payer). This can be used by e.g. an online web shop to request a payment for a customer. The customer is requested to approve the transaction on the customer client.
- Customer (Payer) have selected product(s) in the merchant web shop and decided to check out. Customer select to pay with Mobile Money.
- The provider system collects the account information for the customer e.g. mobile number and calculate the total amount of the products.
- The provider system sends a request to pay (POST /requesttopay) operation to Wallet Platform. This request includes the amount and customer (Payer) account holder number.
- Wallet Platform will respond with HTTP 202 Accepted to the provider system
- Provider shall inform the customer that a payment needs to be approved, by giving information on the merchant web page. For example, the merchant could show information that payment is being processed and that customer needs to approve using the own client, e.g. USSD, mobile app.
- Wallet Platform will process the request so that the customer can approve the payment. The request to pay will be in PENDING state until the customer have approved/Rejected the payment.
- The Customer (Payer) will use his/her own client to review the payment. Customer can approve or reject the payment.
- Wallet platform will transfer the funds if the customer approves the payment. Status of the payment is updated to SUCCESSFUL or FAILED.
- If a callback URL was provided in the POST /requesttopay then a callback will be sent once the request to pay have reached a final state (SUCCESSFUL, FAILED). Note the callback will only be sent once. There is no retry.
- GET request can be used for validating the status of the transaction. GET is used if the partner system has not requested a callback by providing a callback URL or if the callback was not received.
Pre-Approval
Pre-approval is used to setup an auto debit towards a customer. The Partner can request a pre-approval from the customer. Once the customer has approved then the partner can debit the customer account without authorization from the customer.
The call flow for setting up a pre-approval is like the request to pay use case. The following picture describes the sequence for pre-approval.

- The Provider sends a POST /preapproval request to Wallet platform.
- Provider shall inform the customer that pre-approval needs to be approved.
- Customer (Payer) will use the own client to view the pre-approval request. Customer can approve or reject the request.
- Callback will be sent if a callback URL was provided in the POST request. The callback is sent when the request has reach a final state (Successful, Failed).
- The Provider can use the GET request to validate the status of the pre-approval.
Transfer
Transfer is used for transferring money from the provider account to a customer.
The below sequence gives an overview of the flow of the transfer use case.

- The Provider sends a POST /transfer request to Wallet platform.
- Wallet platform will directly respond to indicate that the request is received and will be processed.
- Wallet platform will authorize the request to ensure that the transfer is allowed. The funds will be transferred from the provider account to the Payee account provided in the transfer request.
- Callback will be sent if a callback URL was provided in the POST request. The callback is sent when the request has reach a final state (SUCCESSFUL, FAILED).
- The Provider can use the GET request to validate the status of the transfer.
Validate Account Holder
Validate account holder can be used to do a validation if a customer is active and able to receive funds. The use case will only validate that the customer is available and active. It does not validate that a specific amount can be received.
The sequence for the validate account holder is described below.

- The Partner can send a GET /accountholder request to validate is a customer is active. The Partner provides the id of that customer as part of the URL
- Wallet platform will respond with HTTP 200 if the account holder is active.
Get Balance
Get balance request is used to check the balance on the default account connected to the API User. The following is the sequence flow for get balance use case.

- The partner will send a GET /account/balance request
- Wallet platform will respond with the available balance on the API user account.
Create Invoice
A merchant may use this to create an invoice that can be paid by an intended payer via any channel at a later stage.
The below sequence gives an overview of the flow of the Invoice Creation API.
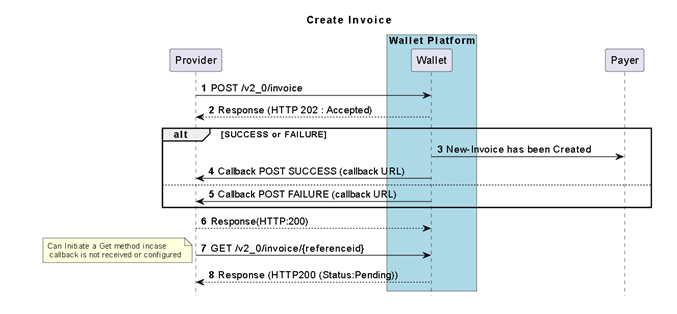
- The Merchant System sends a created invoice request POST /v2_0/invoice, that contains invoice details as according to the interface specification.
- Partner Gateway checks if the Merchant (partner) is authorized to perform the operation.
- Partner Gateway checks if the Merchant’s access token and not expired token. If access token has expired, Merchant system needs to create a new access token.
- Since operations are asynchronous, the Partner Gateway creates the transaction and responds with HTTP 202 Accepted.
- Partner Gateway sends the request on behalf of the Merchant towards the Wallet Platform.
- Wallet Platform checks if the Partner Gateway has authorization to perform the request on behalf of the Merchant.
- Wallet Platform processes the request. Status of the transaction is updated to SUCCESSFUL or FAILED.
- If a callback URL was provided in the request, then the callback is sent once the transaction have reached a final state (SUCCESSFUL, FAILED).
- Alternatively the request GET /v2_0/invoice/{referenceid} can be used for validating the status of the transaction. The request should be used if the partner system has not requested a callback (no callback URL was provided), or if the callback was not received, Get Transaction Status.
- Merchant receives the result. Notification will be sent towards consumer and merchant over the configured notification channel.
Cancel Invoice
A merchant may use this to cancel an invoice that can be paid by an intended payer via any channel at a later stage.
The below sequence gives an overview of the flow of the Invoice Cancel API
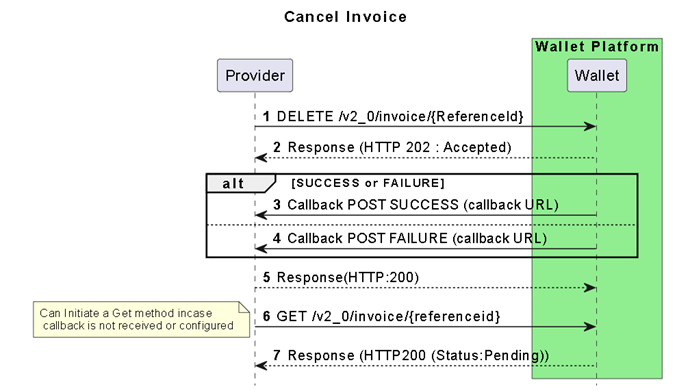
- The Merchant System sends a cancel invoice request DELETE /v2_0/invoice/{ReferenceId}, that contains invoice details as according to the interface specification.
- Partner Gateway checks if the Merchant (partner) is authorized to perform the operation.
- Partner Gateway checks if the Merchant’s access token and not expired token. If access token has expired, Merchant system needs to create a new access token.
- Since operations are asynchronous, the Partner Gateway creates the transaction and responds with HTTP 202 Accepted.
- Partner Gateway sends the request on behalf of the Merchant towards the Wallet Platform.
- Wallet Platform checks if the Partner Gateway has authorization to perform the request on behalf of the Merchant.
- Wallet Platform processes the request. Status of the transaction is updated to SUCCESSFUL or FAILED.
- If a callback URL was provided in the request, then the callback is sent once the transaction have reached a final state (SUCCESSFUL, FAILED).
- Alternatively the request GET /v2_0/invoice/{referenceid} can be used for validating the status of the transaction. The request should be used if the partner system has not requested a callback (no callback URL was provided), or if the callback was not received.
Let's get testing
We now have an understanding of the structure of the API, let us test it!